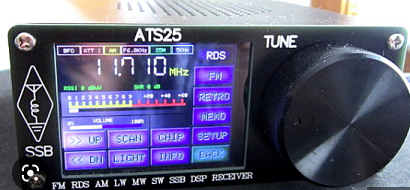
Originally published May 3, 2023. Updated September 2026 with clearer instructions, working resources and an important compatibility warning.
Updating the firmware in an ATS-25 receiver can add features and improve how the radio works. However, the ATS-25 name is used on several different receivers.
Do not install firmware until you know it matches your exact radio. The wrong firmware may leave the receiver unable to start.
Important: This guide covers the older ESP32-based ATS-25 shown in the Radio Workshop video. It may not apply to an ATS-25 Max, ATS-25 AMP, ATS-25X2, ATS Mini or another newer model.
What Does the Firmware Update Change?
The firmware shown in the original video added several improvements, including:
- Faster S-meter response
- Easier band scanning
- New display features
- Changes to radio controls
- Fixes for some battery-reading problems
The exact changes depend on the firmware version you install.
Before You Start
You will need:
- A compatible ESP32-based ATS-25 receiver
- A data-capable USB cable
- A Windows, Mac or Linux computer
- The Arduino IDE
- The correct ATS-25 firmware files
- The PU2CLR SI4735 library
- The TFT_eSPI display library
Take pictures of your current radio settings before starting. The update may erase saved stations or other settings.
Make sure the battery is charged. Do not disconnect the USB cable while firmware is being uploaded.
Step 1: Confirm Your ATS-25 Model
Look for a model name, board version or firmware number on the radio’s information screen, case or original product listing.
ATS-25 receivers that look alike may use different screens, wiring or board settings. A firmware file working on one model does not prove that it will work on another.
If you cannot identify the hardware, stop here and ask the seller or firmware developer before continuing.
Step 2: Download the Firmware Instructions
The ATS-25 files and firmware information on GitHub include instructions for the older ESP32-based receiver.
The repository also contains modified firmware marked use at your own risk. Read the notes before downloading anything.
Do not use an unknown file simply because its name contains “ATS-25.”
Step 3: Install the Arduino IDE
Download and install the Arduino IDE from the official Arduino website.
Open the program after installation.
If your computer does not detect the radio, you may also need the correct USB serial driver. The older instructions refer to the CH341 driver. Some computers already include it.
Step 4: Add ESP32 Support
Open Arduino IDE → Preferences.
Add this address under Additional Boards Manager URLs:
https://raw.githubusercontent.com/espressif/arduino-esp32/gh-pages/package_esp32_index.json
Next, open Boards Manager, search for ESP32, and install the ESP32 board package.
Step 5: Install the Required Libraries
Open Library Manager in the Arduino IDE.
Search for and install:
- PU2CLR SI4735
- TFT_eSPI
The PU2CLR SI4735 library controls the receiver chip used in many ATS-25 radios.
Use the library versions recommended by your chosen firmware whenever the instructions name a specific version.
Step 6: Install the Correct Display Files
The older update package includes two files used to set up the display:
Setup1_ILI9341.hUser_Setup_Select.h
These files replace matching files in the TFT_eSPI library folder.
This step is important. Using the wrong display setup may cause a blank or badly formatted screen.
Only use the display files supplied for your exact receiver and firmware.
Step 7: Open the Firmware
Open the main .ino firmware file in the Arduino IDE.
For the older Bernard Binns 4.0 firmware, the file is named:
SI4735_2.8_TFT_SI5351_V4.0.ino
A newer firmware package may use a different filename. Follow the instructions supplied with that version.
Step 8: Select the Board and USB Port
From the Tools menu, select:
- Board: ESP32 Dev Module
- Port: The USB port connected to the ATS-25
If no port appears, try another USB cable. Some USB cables provide power but cannot transfer data.
You may also need to install the USB serial driver mentioned earlier.
Step 9: Check and Upload the Firmware
Use the Verify button first. This checks the firmware for errors without changing the radio.
If the check finishes without errors, select Upload.
Do not unplug the radio or close the Arduino IDE during the upload.
Wait for the IDE to report that the upload is complete.
Step 10: Test the Receiver
Restart the ATS-25 and check:
- Does the display work correctly?
- Does the tuning knob respond?
- Can the radio change bands?
- Can it receive AM, FM and shortwave signals?
- Does the S-meter move?
- Are the touch controls lined up correctly?
If the screen is blank or the controls do not work, the firmware or display setup may not match your hardware.
Common Problems
The Computer Cannot Find the Radio
Try another USB cable and USB port. Confirm that the cable supports data. Install the correct USB serial driver if needed.
The Firmware Will Not Compile
Check that the ESP32 board package and both required libraries are installed. A new library version may not work with an older firmware file.
The Screen Is Blank
The TFT_eSPI display files may be wrong for your receiver. Recheck the hardware version and display instructions.
The Radio Will Not Start
Disconnect the radio, check the selected board and confirm that the firmware matches your exact ATS-25 model. Do not keep uploading random firmware files.
Is the Update Worth Doing?
The update may be worthwhile if your receiver is compatible and you want the added features.
If the radio already works well, there is no need to update it simply because another firmware version exists. Firmware updates always carry some risk.
Read all instructions first, confirm your model and take your time.
Watch the Original Update Video
This article is based on the update performed by Radio Workshop using Bernard Binns firmware. The video shows the updated receiver and explains the creator’s experience.
The video is a helpful companion to this guide, but remember that newer ATS-25 models may require different files and steps.
Affiliate disclosure: The links below are paid links. As an Amazon Associate I earn from qualifying purchases.
Shop ATS-25 Receivers
Compatibility note: These receivers may use different hardware and firmware. The update instructions above do not apply to every ATS-25 model. Confirm compatibility before installing firmware.
Discover more from KE2YK
Subscribe to get the latest posts sent to your email.

