
Leverage the power of your X6100 with the latest custom firmware for enhanced performance and features.
Introduction:
Steve K9MG is at it again. This time Steve is demonstrating the features of the newly released R1CBU beta firmware! It’s great to see that someone has decided to vastly improve upon a host of issues that plague the XIEGU X61000 factory firmware.
Want to get the best bang for your buck out of the X6100? Well, there’s great news for you! The R1CBU non-destructive beta firmware for the X6100 is here. What does non-destructive mean? You are booting the R1CBU firmware from an SD Card. On ce the SD Card is removed, your transceiver reverts back to the factory firmware.
The R1CBU firmware has a completely new interface and features that will take your radio experience to the next level. In his video Steve covers the step by step firmware install and the takeaways of Steve’s video are discussed below.
Benefits of the New Custom Firmware
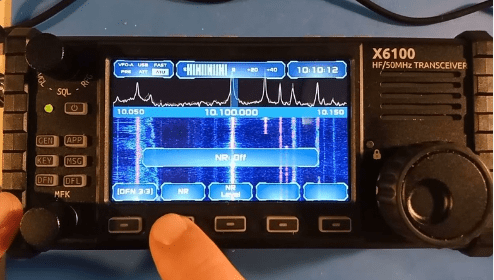
The R1CBU firmware is an open-source firmware that has been developed by amateur radio enthusiasts. The new firmware has numerous features that make it stand out from the factory firmware. For instance, the new interface has a beautiful layout with a high level of customization. Additionally, the firmware has a new band plan that highlights the bands on the waterfall as you scroll through them.
Another significant benefit of using R1CBU firmware on X6100 ham radio is that it has a fully open-source base OS and front end. This means that you can contribute to the development of the firmware and make it even better. The firmware also has improved audio quality, making your radio experience even more enjoyable.
Step-by-Step Guide on How to Install the Firmware
To install the firmware on your X6100 radio, follow these steps:
- Go to the R1CBU website and download the firmware.
- Download Etcher from Bellina.io and install it on your computer.
- Insert your SD card into your computer and open Etcher.
- Select the firmware file and the SD card and click on “Flash.”
- Once the firmware has been flashed onto the SD card, insert the card into the radio’s SD card slot.
- Turn on the radio, and the firmware will automatically install.
Takeaways
The new R1CBU firmware for X6100 is a game-changer for radio enthusiasts. With its fully customizable interface, improved audio quality, and open-source development, this firmware is a must-have for any X6100 radio owner. Additionally, the firmware has numerous features such as a new band plan that highlights bands on the waterfall, making it easier to navigate through them.
Conclusion:
If you’re an X6100 radio owner, the R1CBU firmware is definitely worth installing. It will take your radio experience to the next level with the improved performance of the R1CBU custom firmware for the X6100 radio. In addition, you may also contribute to the future development of new R1CBU firmware versions. So, head over to the R1CBU website, download the firmware, and install it today!
Author Bio:
Steve KM9G is a seasoned tech blogger with a passion for electronics and radio communication. He has been blogging about radio communication for years and has a wealth of knowledge on the subject.
KE2YK’s advice:
Having done many firmware updates on radio equipment over the years, I’d recommend checking out the R1CBU firmware. This custom firmware opens a whole new world of features that XIEGU itself should be offering for the X6100. With all the current and planned benefits of this non-invasive firmware, installing it is a no-brainer.
The R1CBU firmware provides a whole new interface and features that will definitely improve your X6100 experience. Taking advantage of these new benefits and the underlying fully open-source O/S makes the X6100 into the radio experience the XIEGU factory should have created for their customers in the first place.
